Creating a Player Shop with ChestShop
Creating your own shop using the ChestShop plugin is straightforward. Follow these steps:
- Place a Chest: Begin by placing a chest on the ground where you want your shop to be.
- Place a Sign: Place a sign one block away from the chest. A common position is directly above the chest.
-
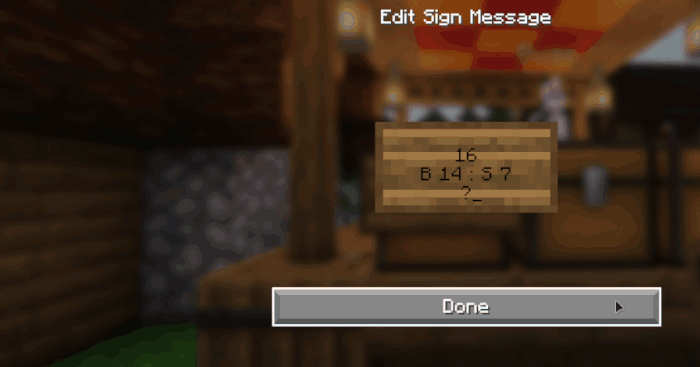
Write on the Sign: Interact with the sign to write the shop details. The format for the sign is crucial:
Here's what each line means:
- Line 1: Leave this line empty. The plugin will automatically fill it with your in-game name.
- Line 2: Enter the amount of items you want to buy or sell in a single transaction.
- Line 3: Specify the prices for buying and/or selling. This line uses a combination of price indicators and values.
Bindicates the price at which players can buy items from your shop.Sindicates the price at which players can sell items to your shop.- Prices are separated by a colon (
:). - Examples of valid price combinations:
B 5: S 5: Players can buy for 5, and sell for 5.B 5: Players can only buy for 5.S free: Players can sell to your shop for free.
- Line 4: Specify the item being traded. You can write
?on the sign, and the plugin will automatically detect the item from the chest when you're done writing the sign or after you click the sign with the item in your hand. Alternatively, you can write the item's name or ID directly. You can find the name of the item you are trying to sell by going to the Minecraft wiki.
-
Complete the Shop: Once the sign is correctly filled out and placed next to the chest, your shop is ready!
Here is an example of a completed shop sign and chest: